 ][layoutpermalink]
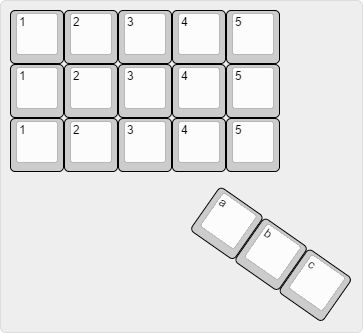
I started doodling with key layouts and [came up with
this][layoutpermalink]. Only 18 switches, but enough for gaming. At the
time, I was putting a lot of hours into Elite
Dangerous, so this felt promising as a spaceship control pad.
[
][layoutpermalink]
I started doodling with key layouts and [came up with
this][layoutpermalink]. Only 18 switches, but enough for gaming. At the
time, I was putting a lot of hours into Elite
Dangerous, so this felt promising as a spaceship control pad.
[ ](https://www.flickr.com/photos/deusx/24872268889/)
[
](https://www.flickr.com/photos/deusx/24872268889/)
[ ](https://www.flickr.com/photos/deusx/24781232904/in/datetaken-public/)
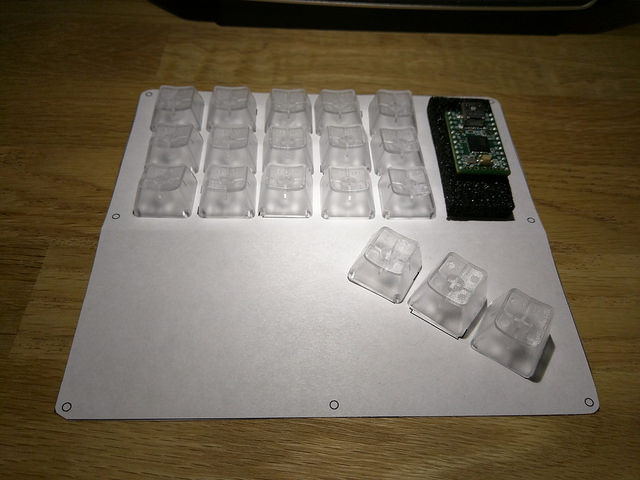
Over on [builder.swillkb.com][builder], I plonked in the JSON from [Keyboard
Layout Editor][layoutpermalink] and came up with some SVG files that printed
up nicely.
That gave me a paper mockup of a mounting plate for key switches. I had some
clear keycaps, so I dropped them onto the paper to get a sense for how it
would feel under my hand.
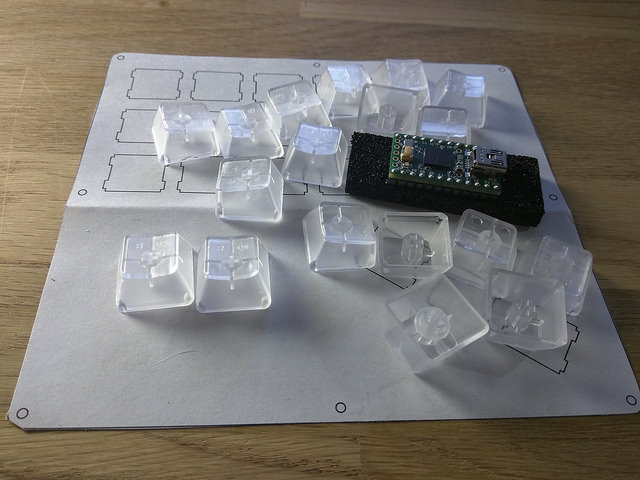
Of course, cats happen - so those keycaps didn't stay put for very long. But,
that's okay. Nothing wandered off too far, and I got what I needed from
the mess on my desk.
[builder]: http://builder.swillkb.com/
## Making the case
Back when [I first started thinking about building a
keyboard][keyboardhacking], I
assumed I'd send off whatever design files I came up with to a place
like [Ponoko](https://www.ponoko.com/) and get the mounting plate made for me.
Prices at those places were just a bit higher than I liked, though. I also
suspected things wouldn't work with my first attempt. I wanted to be able
to iterate without it taking days or weeks to learn from my mistakes
and refine.
That's when I remembered [i3Detroit][] was just down the road. I'd been
meaning to get over there for a couple of years: Among other things, the space
has [nice laser cutters][lasercutters] that I really wish I'd used [back when
I butchered some plastic to make a terrible PC monitor case][monitorcase].
[lasercutters]: https://www.i3detroit.org/wiki/Category:Laser_Cutter
[monitorcase]: http://blog.lmorchard.com/2013/02/10/building-my-couch-computing-station/
[i3Detroit]: https://i3detroit.org
A month or so later, I'd gotten through the new member onboarding process
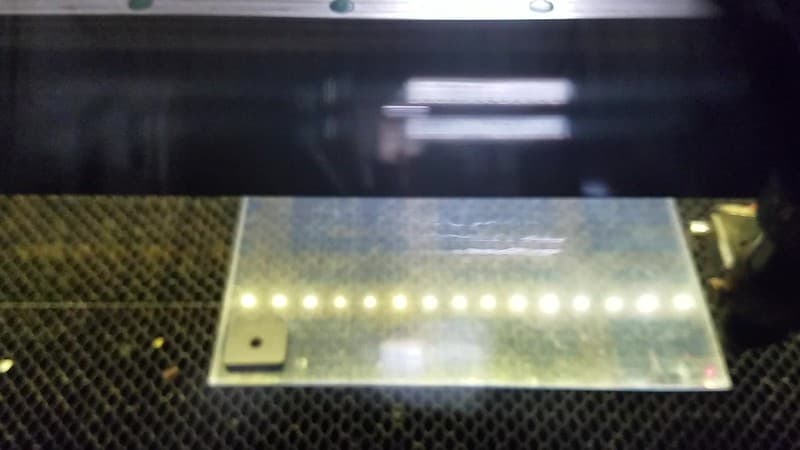
and a few training sessions with the laser cutter. I had some
acrylic sheets still on hand, so I gave my design a shot:
Pretty sure I had the power too high and the speed too low for the run
in this video. But, the result was not too bad for a first attempt. I had a
few dozen Cherry MX Clear switches to play with, so I snapped them into the
plate and put on the keycaps I'd used in the paper mockup earlier:
](https://www.flickr.com/photos/deusx/24781232904/in/datetaken-public/)
Over on [builder.swillkb.com][builder], I plonked in the JSON from [Keyboard
Layout Editor][layoutpermalink] and came up with some SVG files that printed
up nicely.
That gave me a paper mockup of a mounting plate for key switches. I had some
clear keycaps, so I dropped them onto the paper to get a sense for how it
would feel under my hand.
Of course, cats happen - so those keycaps didn't stay put for very long. But,
that's okay. Nothing wandered off too far, and I got what I needed from
the mess on my desk.
[builder]: http://builder.swillkb.com/
## Making the case
Back when [I first started thinking about building a
keyboard][keyboardhacking], I
assumed I'd send off whatever design files I came up with to a place
like [Ponoko](https://www.ponoko.com/) and get the mounting plate made for me.
Prices at those places were just a bit higher than I liked, though. I also
suspected things wouldn't work with my first attempt. I wanted to be able
to iterate without it taking days or weeks to learn from my mistakes
and refine.
That's when I remembered [i3Detroit][] was just down the road. I'd been
meaning to get over there for a couple of years: Among other things, the space
has [nice laser cutters][lasercutters] that I really wish I'd used [back when
I butchered some plastic to make a terrible PC monitor case][monitorcase].
[lasercutters]: https://www.i3detroit.org/wiki/Category:Laser_Cutter
[monitorcase]: http://blog.lmorchard.com/2013/02/10/building-my-couch-computing-station/
[i3Detroit]: https://i3detroit.org
A month or so later, I'd gotten through the new member onboarding process
and a few training sessions with the laser cutter. I had some
acrylic sheets still on hand, so I gave my design a shot:
Pretty sure I had the power too high and the speed too low for the run
in this video. But, the result was not too bad for a first attempt. I had a
few dozen Cherry MX Clear switches to play with, so I snapped them into the
plate and put on the keycaps I'd used in the paper mockup earlier:
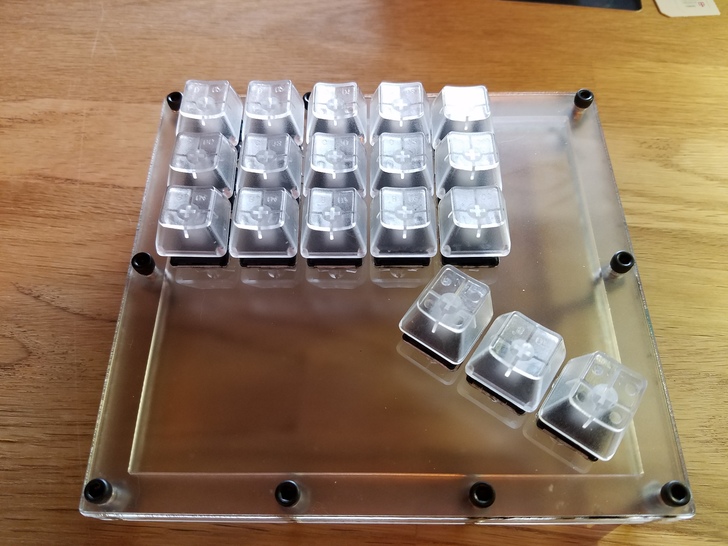 Still lots of work ahead, but I was feeling pretty accomplished after taking
this little glamour shot. I even took it into an [i3Detroit][] member meeting
for show & tell.
## Re-making the case
At this point, I'd already heard the term "kerf". Like a saw blade, the laser
has a width that destroys material while cutting. You want that on the
*inside* edge of something like a key switch mounting hole, in order to keep
the dimensions correct. Unlike a blade, the laser is a cylindrical
beam that passes through a lens to form [something like an
hourglass][beamshape]. So, the
kerf's shape depends on the lens focal length and the conical section that
intersects with the material.
[beamshape]: http://www.buildlog.net/blog/2013/05/why-are-my-laser-cut-edges-not-straight/
Well, I didn't account for the kerf well enough in my first plate. All the key
switches were wobbly. Some would just fall out if I flipped
the thing over. Time for some of those iterations I
figured I'd have to end up doing.
Still lots of work ahead, but I was feeling pretty accomplished after taking
this little glamour shot. I even took it into an [i3Detroit][] member meeting
for show & tell.
## Re-making the case
At this point, I'd already heard the term "kerf". Like a saw blade, the laser
has a width that destroys material while cutting. You want that on the
*inside* edge of something like a key switch mounting hole, in order to keep
the dimensions correct. Unlike a blade, the laser is a cylindrical
beam that passes through a lens to form [something like an
hourglass][beamshape]. So, the
kerf's shape depends on the lens focal length and the conical section that
intersects with the material.
[beamshape]: http://www.buildlog.net/blog/2013/05/why-are-my-laser-cut-edges-not-straight/
Well, I didn't account for the kerf well enough in my first plate. All the key
switches were wobbly. Some would just fall out if I flipped
the thing over. Time for some of those iterations I
figured I'd have to end up doing.
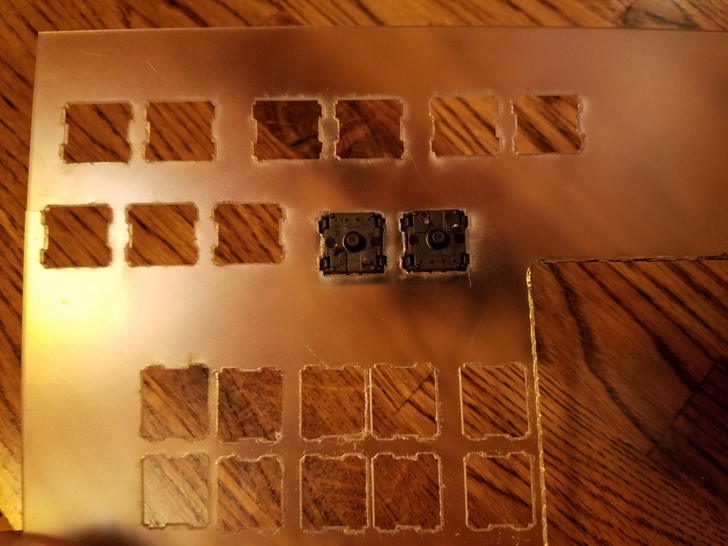 I know the saying is "measure twice, cut once" - but in this case it was
easier to measure by cutting! I tried mounting holes with a sampling of kerf
widths until I found one that matched the key switch tolerances. Not so snug
that it cracked the plate, but not so loose that it wiggled or fell out.
Once I found a good laser focus and figured out the kerf, I
attacked another sheet of acrylic with the laser to produce another
iteration of the case.
[
I know the saying is "measure twice, cut once" - but in this case it was
easier to measure by cutting! I tried mounting holes with a sampling of kerf
widths until I found one that matched the key switch tolerances. Not so snug
that it cracked the plate, but not so loose that it wiggled or fell out.
Once I found a good laser focus and figured out the kerf, I
attacked another sheet of acrylic with the laser to produce another
iteration of the case.
[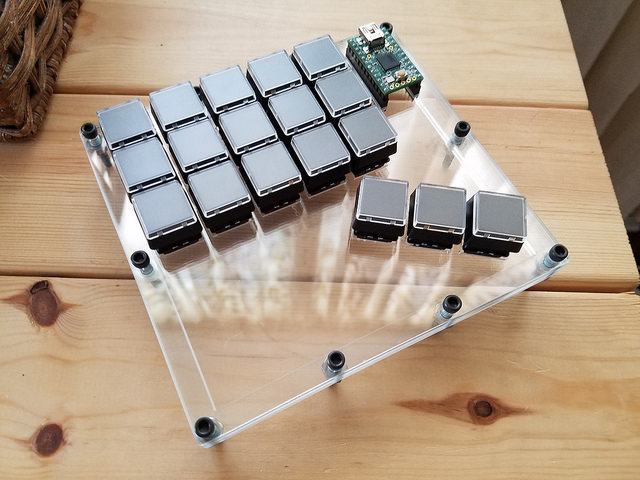 ](https://www.flickr.com/photos/deusx/26975072884/)
Two changes you might notice: I added slots to glue in some socket
headers, so I could unplug or replace the Teensy without soldering. I also found some
[relegendable keycaps][] on Massdrop - they have little removable covers that
take 14mm paper squares. I figured that would come in handy for crazy
key layouts I might come up with.
[relegendable keycaps]: http://dro.ps/b/x3g0KCy
## Wiring up the key matrix
I haven't learned how to design circuit boards yet, so I figured I'd just
handwire this [like I saw in the video][handwirevideo]. Only 18 switches, so
how bad could it be?
Turns out, it's rather annoying. Interesting exercise with my terrible old
Radio Shack soldering iron.
](https://www.flickr.com/photos/deusx/26975072884/)
Two changes you might notice: I added slots to glue in some socket
headers, so I could unplug or replace the Teensy without soldering. I also found some
[relegendable keycaps][] on Massdrop - they have little removable covers that
take 14mm paper squares. I figured that would come in handy for crazy
key layouts I might come up with.
[relegendable keycaps]: http://dro.ps/b/x3g0KCy
## Wiring up the key matrix
I haven't learned how to design circuit boards yet, so I figured I'd just
handwire this [like I saw in the video][handwirevideo]. Only 18 switches, so
how bad could it be?
Turns out, it's rather annoying. Interesting exercise with my terrible old
Radio Shack soldering iron.
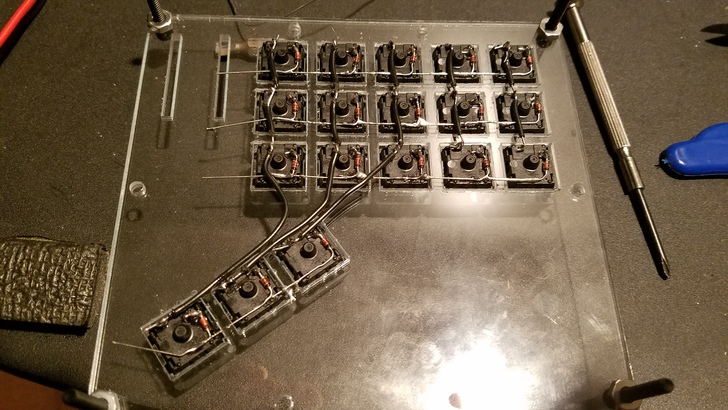 I think I'd much rather get over that PCB fabrication hurdle for when I try
scaling this up to a 60% keyboard like my HHKB.
The technique here involves first building up rows of diodes across the
right-hand pin of every key switch. The diodes serve to prevent [ghosting when
multiple keys are pressed][ghosting].
Then, I stripped sections of wires to
run as columns down the left-hand pin of the switches.
The remaining
insulation ensures the column wires don't short against the row diodes.
[handwirevideo]: https://www.youtube.com/watch?v=MrokZ1afnVg
[ghosting]: https://deskthority.net/wiki/Rollover,_blocking_and_ghosting
## Wiring up the Teensy
I think I'd much rather get over that PCB fabrication hurdle for when I try
scaling this up to a 60% keyboard like my HHKB.
The technique here involves first building up rows of diodes across the
right-hand pin of every key switch. The diodes serve to prevent [ghosting when
multiple keys are pressed][ghosting].
Then, I stripped sections of wires to
run as columns down the left-hand pin of the switches.
The remaining
insulation ensures the column wires don't short against the row diodes.
[handwirevideo]: https://www.youtube.com/watch?v=MrokZ1afnVg
[ghosting]: https://deskthority.net/wiki/Rollover,_blocking_and_ghosting
## Wiring up the Teensy
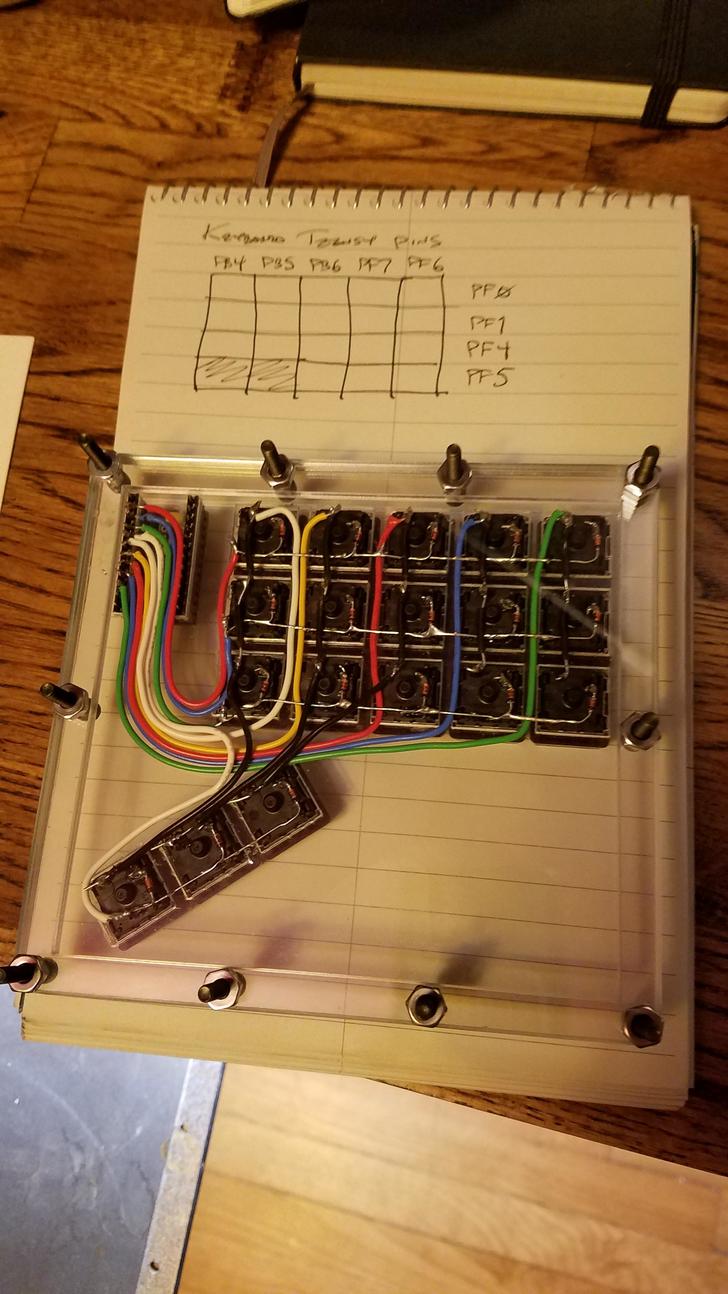 This matrix gives me 4 rows (counting the thumb switches) and 5 columns - or 9
I/O pins to scan 18 switches.
Except for [magical PD6][pd6] - which is hardwired to an onboard LED - just
about every pin is fair game on the Teensy for rows or columns.
So, I tried to pick a set that would be easiest to route wires. Since this
case is transparent, I wanted to keep things visually interesting with
different colored wires and a neat shape to the runs.
Of course, I botched things a bit and marred the acrylic by splashing
solder and slipping with the iron a few times. But, maybe no one will really
notice.
If I had to do this over again - and I *still* hadn't learned how to make a
PCB - I'd probably try using something thinner like [30AWG repair
wire][30awg]. That seems like it would thread through the spaces much
better, which would be even more important for a board with many more
switches.
[30awg]: https://www.adafruit.com/product/1446
[pd6]: https://geekhack.org/index.php?topic=72804.0
This matrix gives me 4 rows (counting the thumb switches) and 5 columns - or 9
I/O pins to scan 18 switches.
Except for [magical PD6][pd6] - which is hardwired to an onboard LED - just
about every pin is fair game on the Teensy for rows or columns.
So, I tried to pick a set that would be easiest to route wires. Since this
case is transparent, I wanted to keep things visually interesting with
different colored wires and a neat shape to the runs.
Of course, I botched things a bit and marred the acrylic by splashing
solder and slipping with the iron a few times. But, maybe no one will really
notice.
If I had to do this over again - and I *still* hadn't learned how to make a
PCB - I'd probably try using something thinner like [30AWG repair
wire][30awg]. That seems like it would thread through the spaces much
better, which would be even more important for a board with many more
switches.
[30awg]: https://www.adafruit.com/product/1446
[pd6]: https://geekhack.org/index.php?topic=72804.0
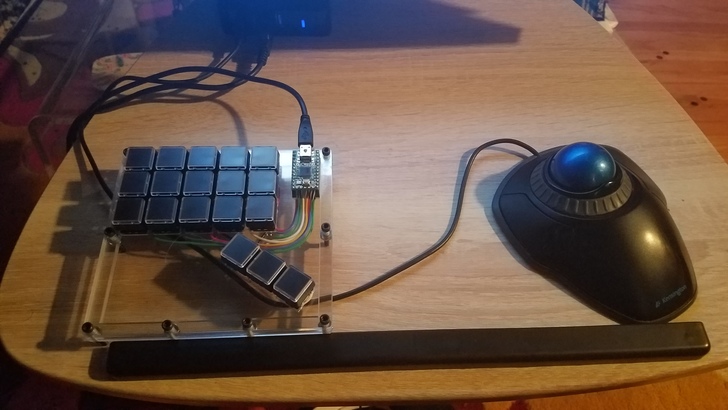
From there, I built [a dead simple key map][plainmap] with just enough keys to play [Overwatch][]: ```c #include "keymap_common.h" const uint8_t PROGMEM keymaps[][MATRIX_ROWS][MATRIX_COLS] = { KEYMAP( ESC, 1, 2, 3, T, \ TAB, Q, W, E, R, \ LSFT, A, S, D, F, \ NO, NO, LCTL, SPC, C), }; const uint16_t PROGMEM fn_actions[] = {}; ``` I got it all working and had myself a nice evening of pushing carts and taking objectives.Holy crap. My attempt at setting up firmware for my newly wired DIY keypad worked first time. How does this happen. https://t.co/xWESzku4Lp
— Les Orchard (@lmorchard) June 25, 2016
 [the matrix]: https://github.com/lmorchard/gamechord/blob/863295d2cbdbc7052a25e989a77c3448796e67a6/matrix.c
[plainmap]: https://github.com/lmorchard/gamechord/blob/863295d2cbdbc7052a25e989a77c3448796e67a6/keymap_plain.c
[gamechordfirmware]: https://github.com/lmorchard/gamechord
[tmk firmware]: https://github.com/tmk/tmk_keyboard
[overwatch]: https://playoverwatch.com/en-us/
## Going crazy with chording
I had all these [relegendable keycaps][] and this crazy flexible [tmk
firmware][] - so I decided to try implementing [a complex and fully impractical
keymap based on chords with the thumb keys][halfqwerty].
[halfqwerty]: https://github.com/lmorchard/gamechord/blob/863295d2cbdbc7052a25e989a77c3448796e67a6/keymap_halfqwerty.c
[the matrix]: https://github.com/lmorchard/gamechord/blob/863295d2cbdbc7052a25e989a77c3448796e67a6/matrix.c
[plainmap]: https://github.com/lmorchard/gamechord/blob/863295d2cbdbc7052a25e989a77c3448796e67a6/keymap_plain.c
[gamechordfirmware]: https://github.com/lmorchard/gamechord
[tmk firmware]: https://github.com/tmk/tmk_keyboard
[overwatch]: https://playoverwatch.com/en-us/
## Going crazy with chording
I had all these [relegendable keycaps][] and this crazy flexible [tmk
firmware][] - so I decided to try implementing [a complex and fully impractical
keymap based on chords with the thumb keys][halfqwerty].
[halfqwerty]: https://github.com/lmorchard/gamechord/blob/863295d2cbdbc7052a25e989a77c3448796e67a6/keymap_halfqwerty.c
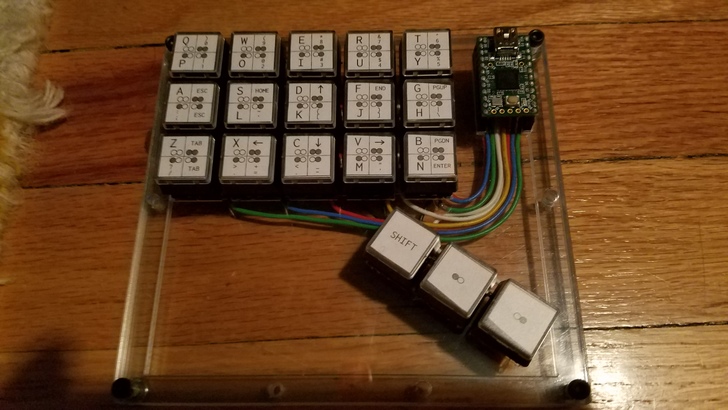 Given two thumb keys in combination, I can get 4 layers out of the other 15
keys - for a total of 60 keys. The firmware also [lets me distinguish
between keys held or just tapped][taps], which gives me a few more layers or
modifier keys.
[taps]: https://github.com/lmorchard/gamechord/blob/863295d2cbdbc7052a25e989a77c3448796e67a6/keymap_halfqwerty.c#L43
Long story short, I can get most of the functionality of a regular keyboard
out of just one hand. All I have to do is just get used to putting my left
hand through some very awkward and uncomfortable contortions until I get up to
full typing speed!
[As I've written before][steamcontroller], I do really like odd input devices.
But, this got old fast. This isn't so much a practical peripheral as a thing I
did because I could. It gave me an excuse to explore the firmware more
and to use Inkscape to design some legends for my nifty keycaps.
[steamcontroller]: http://blog.lmorchard.com/2016/02/05/steam-controller/
## Showing it off
And just to wrap things up, this happened:
Given two thumb keys in combination, I can get 4 layers out of the other 15
keys - for a total of 60 keys. The firmware also [lets me distinguish
between keys held or just tapped][taps], which gives me a few more layers or
modifier keys.
[taps]: https://github.com/lmorchard/gamechord/blob/863295d2cbdbc7052a25e989a77c3448796e67a6/keymap_halfqwerty.c#L43
Long story short, I can get most of the functionality of a regular keyboard
out of just one hand. All I have to do is just get used to putting my left
hand through some very awkward and uncomfortable contortions until I get up to
full typing speed!
[As I've written before][steamcontroller], I do really like odd input devices.
But, this got old fast. This isn't so much a practical peripheral as a thing I
did because I could. It gave me an excuse to explore the firmware more
and to use Inkscape to design some legends for my nifty keycaps.
[steamcontroller]: http://blog.lmorchard.com/2016/02/05/steam-controller/
## Showing it off
And just to wrap things up, this happened:
This was the first summer I went to [Maker Faire Detroit][] as a Maker. I helped for a bit at the [i3Detroit][] tent, mainly just standing and smiling at the front table as folks walked in. But, I had my little keyboard out there on a table, with a project card and everything. It and I were only there for a handful of hours, but it's pretty satisfying to have actually gotten this thing done! [maker faire detroit]: http://www.makerfairedetroit.com/ [laservideo]: https://www.flickr.com/photos/deusx/25839524664/ [layoutpermalink]: http://www.keyboard-layout-editor.com/##@_name=gamechord&author=lmorchard;&@=1&=2&=3&=4&=5;&@=1&=2&=3&=4&=5;&@=1&=2&=3&=4&=5;&@_r:35&rx:2.5&ry:3.5&y:-1&x:1;&=a&=b&=cI even have a project out in the @i3Detroit tent at #MakerFaireDetroit ! pic.twitter.com/v0goD3DCBk
— Les Orchard (@lmorchard) July 30, 2016