---
title: "Building a USB controller for an IBM Model M"
date: 2016-02-21T12:00:00-07:00
url: https://blog.lmorchard.com/2016/02/21/modelm-controller/
author: Les Orchard
tags: [modelm, diy, keyboards, hardware, teensy, microcontrollers, electronics]
---
# Building a USB controller for an IBM Model M
**TL;DR**: I wired up a Teensy 2.0++ to an IBM Model M keyboard,
which gave it a USB interface and custom firmware that can remap keys and do
other interesting things.
In my [previous post][keyboard-hacking], I wrote about my initial forays into
keyboard hacking. I got my hands on a few IBM Model M keyboards, and built a
PS/2-to-USB converter with a [Teensy 2.0][teensy] so I could use it with my
MacBook Pro after remapping some keys via the [TMK keyboard firmware][tmk].
That was a pretty rewarding little hack. But, then, I found [Lawrence Wu's
notes][original-notes] on replacing the original controller inside the IBM
Model M. In a nutshell, it turns out you can find ribbon connectors that work
with the Model M membrane layers and fit on a breadboard. That makes it easy
to build - and reversible if I decide to return the keyboard to its original
state.
## Initial Prototype
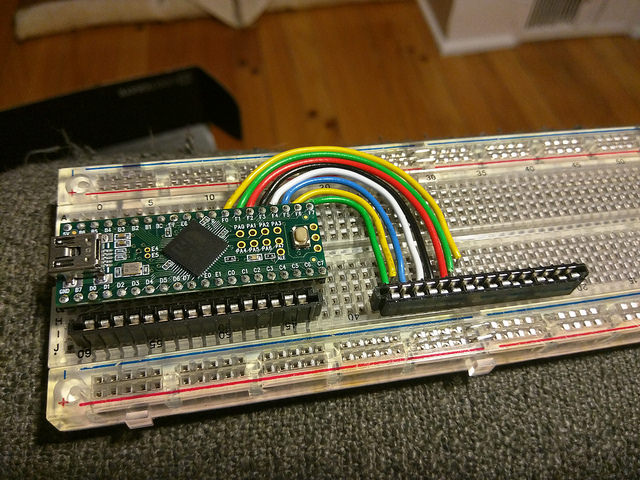
So, I ordered a few of the [16-pin ribbon connectors from Mouser][connector]
and a [Teensy 2.0++][teensy-plus]. My first stab at wiring things up was
pretty simple:
[connector]: http://www.mouser.com/ProductDetail/TE-Connectivity/6-520315-6/?qs=sGAEpiMZZMvYKGyZxp8jxkA16bSpREuh
The [Teensy 2.0++][teensy-plus] has 20 pins per side, and I needed 16 for the
first ribbon. So, it was convenient to just plonk both onto the breadboard and
take advantage of the built-in conductors. That's also why I upgraded from a
[Teensy 2.0][teensy]: I needed more pins. The second ribbon needed
8 pins, so I cut some lengths of [hook-up wire][hookup] to keep things neat
and ran the connections over.
[tmk]: https://geekhack.org/index.php?topic=41989.0
[hookup]: http://amzn.to/1oCuCJ1
## Driving Me Nuts
Then, I wanted to get inside the keyboard to start tinkering. As it turns out,
opening up an IBM Model M is annoying: None of the tools I had on hand could
do it.
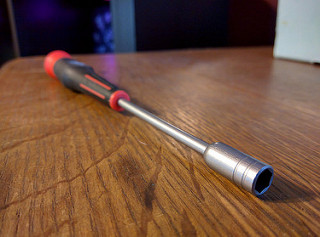
The case is assembled using screws with 5.5mm nut heads, rather than
something like a Phillips-head screw. And, the screws are down in deep wells
too narrow to fit any of the socket wrench heads I had on hand.
So, I had to order [a 5.5mm nut driver][nut-driver] with a very slim head.
Reading [the reviews][reviews], I can see I'm not alone in this.
While that made its way to my house, I'd read that [some folks used a lighter
and a pen][driver-hack] to form a makeshift nut driver. That was a terrible
idea, but it worked. In hindsight, I really should have just waited for the
driver to show up. But, I was determined to get the thing open while I had
time to play with it.
[reviews]: http://www.amazon.com/Dynamite-2803-Nut-Driver-5-5mm/product-reviews/B000BQ4XP6/ref=cm_cr_dp_see_all_summary?ie=UTF8&showViewpoints=1&sortBy=helpful
[driver-hack]: https://deskthority.net/workshop-f7/model-m-disassembly-t1960.html#p34013
## The Original Controller
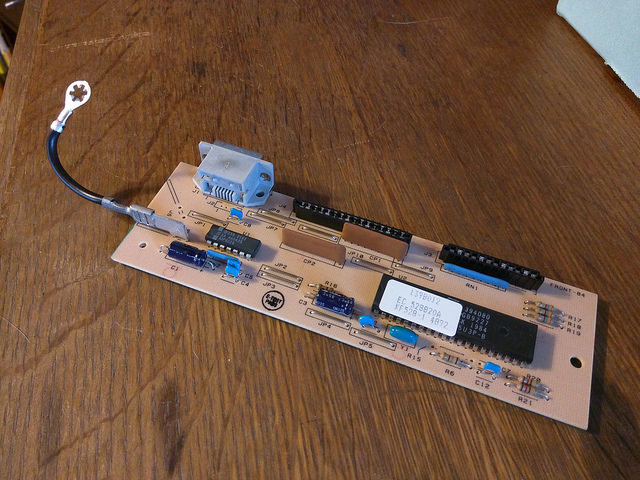
And, once open, this is the board I found inside:
I should have taken a picture of it in place, but oh well. The board has a
grounding strap that was screwed down to the steel plate under the keys.
Beyond that, it just fit into plastic brackets in the case and wasn't
otherwise fastened down. And, in a weird coincidence, the board was almost the
exact same dimensions as my breadboard. Maybe these things are standard sizes?
## Mapping the Membranes
With the keyboard membrane ribbons free from the original board, I hooked them up to
my prototype. From there, I wanted to start making the keys send the right
signals. There are three parts to this:
1. Mapping Teensy pins to a 16 x 8 switch matrix
2. Mapping the 16 x 8 switch matrix to physical key locations
3. Mapping physical key locations to USB key codes
To accomplish #1, [I set up pins in the firmware][pins]. The way this works is
that the rows are set to input and the columns are set to output. By pulsing a
current for each column in turn and reading the rows, you can build up a
matrix of switch state where the circuit is completed. This is called
[scanning the keyboard][scanning]. There are problems in this process - [like
ghosting][ghosting] - but I'll skip describing them for now.
[scanning]: https://www.massdrop.com/article/introduction-to-keyboard-programming
[ghosting]: http://blog.komar.be/how-to-make-a-keyboard-the-matrix/
To double check that I had my matrix working, I threw together an initial
keymap and set every key to emit "1". I tapped each key and saw a "1" in my
notepad. Hooray, it worked! At least, electrically speaking.
[pins]: https://github.com/lmorchard/tmk_keyboard/blob/bdde5f9413ce5c3ea627f201b04f04fe371806ce/keyboard/modelm/matrix.c#L163
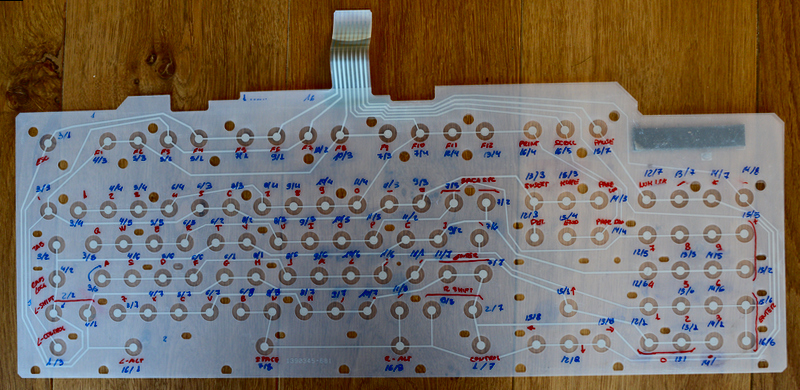
For step #2, I started googling for IBM Model M membrane matrix maps. Surely
someone had done this before! Well, [it turns out someone had][matrix-map].
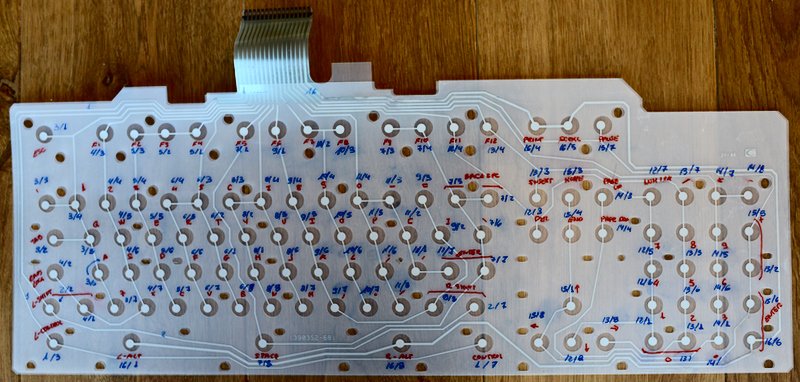
Deskthority user [idollar][] had traced all the wires and annotated the
membranes with row & column numbers in marker:
[idollar]: https://deskthority.net/idollar-u6930/
[matrix-map]: https://deskthority.net/workshop-f7/universal-model-m-controller-t9820.html#p207736
Just to be clear: These two are not my photos. I stand on the shoulders of
[forum giants][idollar]. But, after awhile, I couldn't really read the
handwriting and started making mistakes.
That's when I remembered [the matrix debug mode in TMK][matrix-debug]: After
configuring just enough keys to enable it, I could just watch the debug
output to tell me the rows & columns as I hit other keys.
[matrix-debug]: https://github.com/tmk/tmk_keyboard#magic-commands
Thus equipped, I spent a Sunday morning over coffee mapping the keyboard:
Methodically pressing keys, noting rows & columns, and building up [the KEYMAP
macro][keymap-macro] that converts symbols for physical keys to logical matrix
positions. Along the way, I also built up [the initial
keymap][keymap-plain] using that macro to assign keycodes to the physical
keys.
[keymap-macro]: https://github.com/lmorchard/tmk_keyboard/blob/bdde5f9413ce5c3ea627f201b04f04fe371806ce/keyboard/modelm/keymap.c#L34
[keymap-plain]: https://github.com/lmorchard/tmk_keyboard/blob/bdde5f9413ce5c3ea627f201b04f04fe371806ce/keyboard/modelm/keymap.c#L54
## Fitting the Prototype
After that, I had an initial stab at steps #2 & #3 - the keyboard was pretty
much working and I could start typing practically with it. But, because I was
hacking on this from the couch, it was all super-awkward holding things
together in my lap.
I should mention that these ribbon connectors have short, fragile leads.
They're really meant for soldering into a PCB. They snap into the breadboard,
but just barely. They spring free at the slightest pressure - you know, like
hooking up ribbons and moving the keyboard around. And, whenever I reinsert
them, invariably one pin or another gets bent up and then snaps off after the
4th or 5th realignment. I'm really glad I bought extras, because I'm down to
my last two that still work.
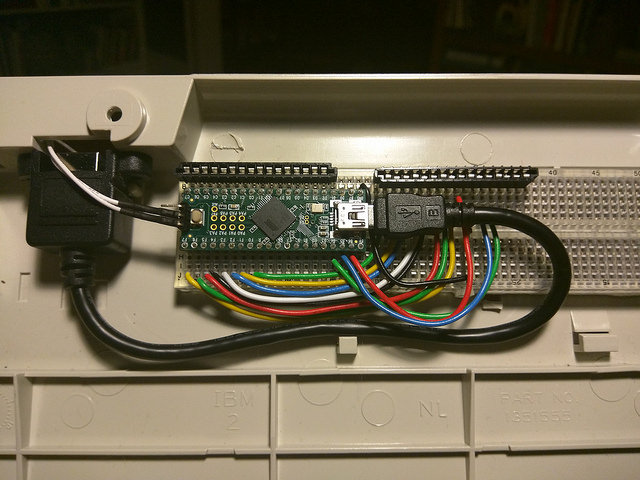
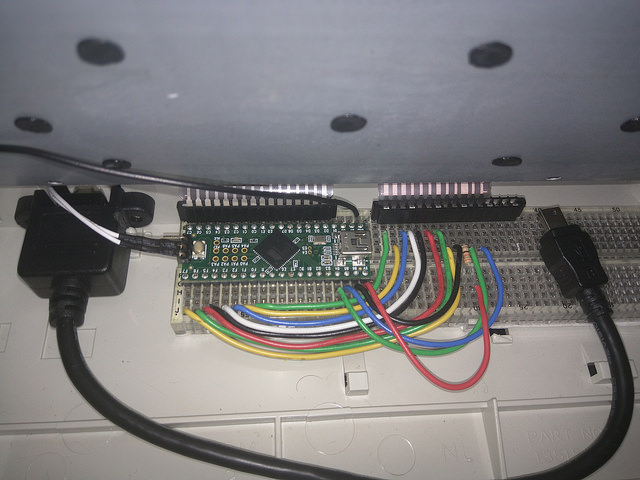
So, I got tired of things falling apart and started positioning my breadboard
into the case. Everything fit physically, but the parts were all in the wrong
place. With a sigh, I pulled everything out of the board, rewired it, and
reassigned all the pins:
That put the ribbon connectors in the right spots for the keyboard membranes
to connect, as well as room for a USB connector I bought to loop around without
too much bend. Oh, and I slightly rewired things again, because I discovered
I'd connected all the LEDs backward:
## My Keyboard is Haunted
After all the rewiring and reassigned pins, I fired things up again. This
time, I started getting mysterious spontaneous keystrokes. I thought it might
be a grounding issue with static electricity, because I could usually make it
happen by waving my hands over the keyboard. While a [theremin][]
keyboard might be fun, that's not actually what I was going for here.
[theremin]: https://en.wikipedia.org/wiki/Theremin
So, I ran a wire from the steel plate to the GND pin on the Teensy. That
didn't fix it.
Finally, I realized that one of my new pins in use was D6 - and
D6 is hardwired to an LED on the Teensy board. And, it so happens that LEDs
can do weird things when hooked up as an input - [such as detecting
light][photodiode]. You know, maybe like the changing light from waving my
hands over the keyboard.
Thus, I was able to exorcise my keyboard ghost by bending up the pin at D6 to
disconnect it from the breadboard. Then, I ran a jumper over to D1 and
[switched the pin assignments in the firmware][d0-pin]. No more spontaneous
keypresses.
[photodiode]: http://www.analog.com/library/analogdialogue/archives/48-08/raq_108.html
[d0-pin]: https://github.com/lmorchard/tmk_keyboard/commit/f5b31e9d320d494a4d3fc75db614883b7225d332
## Secrets of 2KRO Matrices
After typing a bit, I realized I couldn't get certain key combinations to work -
Shift-T, for example.
Now, I know that the IBM Model M isn't [an NKRO keyboard][nkro]. That is, you
cannot press any arbitrary combination of keys together. But, of course, a
keyboard is useless if you can't press at least *some* keys together - like, say,
Shift and T. In fact, I've read that the IBM Model M is described as 2KRO -
i.e. two-key rollover.
So, I knew that the original controller supported Shift-T. Looking in the
matrix debug output, I noticed that I couldn't press any 2 keys in the same
row together - that included Left Shift and T.
Scratching my head, I noticed that the membrane matrix had some interesting
properties: Pretty much all the modifier keys were in different columns than
the other keys I wanted to press along with them. So, my problem might be
solved by rotating the matrix - that is, [turning rows into columns and columns
into rows][matrix-swap].
I don't entirely have my head wrapped around the design of the Model M
membrane layout, but I think this is part of it: After I rotated the matrix,
there are 8 columns per row. As far as I can tell, only one key can be pressed
per row - so that means any given key has 7 others that cannot be pressed at
the same time. Practical key rollover, then, is implemented by putting keys
you're likely to press together in different rows.
For example, modifiers like Left Shift and Right Shift share a row, and so
cannot be pressed together. But, Left Shift & T are found in different rows
and can work together. However, some of the letters in the QWER & ASDF cluster
share rows, so that can be trouble for gaming - directional keypresses and
suchlike might cancel each other out in the heat of the keymashing moment.
But, since this keyboard harkens to an era where keys were more for typing
words than for controlling games, the tradeoff makes sense.
[nkro]: https://deskthority.net/wiki/Rollover,_blocking_and_ghosting
[matrix-swap]: https://github.com/lmorchard/tmk_keyboard/commit/afc4d0f23be23e8c69bc1dfbe127898a7fe82db7
## The Result
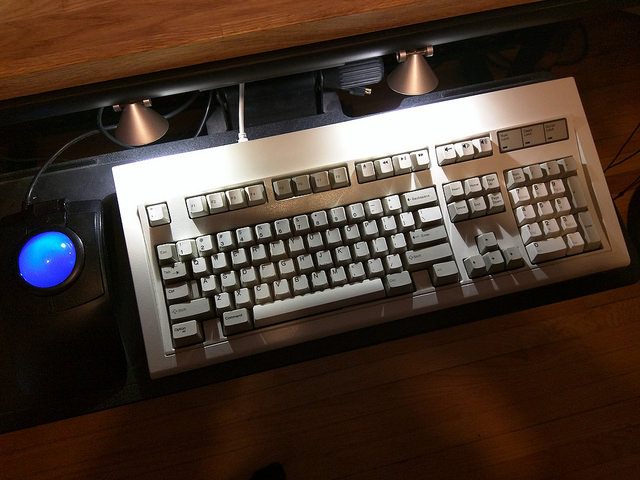
So, after all the above and a few more random adventures in C programming,
this IBM Model M keyboard is now sitting on my desk with a USB cable plugged
into it.
I ordered [some custom replacement keycaps from Unicomp][unicomp] to reflect
some of the remapped keys I implemented - i.e. media control, Command (⌘),
Caps Lock replaced by Ctrl.
I've been having some clicky-clacky fun with this thing, and it's been easy to
reconfigure & reflash along the way as needed. Experience with [TMK][] to
configure my previous project really came in handy.
[unicomp]: http://www.pckeyboard.com/page/category/Buttons
The one part that could be considered irreversible with this project is that I
ended up drilling two small holes in the back to secure the USB port. I'm just
slightly sad about that. But, I guess if I ever sell this thing on eBay, I'll
try talking up the benefits of the new USB controller.
But, otherwise, if I wanted to undo all this work, I could just open it back
up and plonk the original controller back in. I've currently got that board
sitting in an anti-static bag in a drawer, taking a rest after decades of
service.
[teensy]: https://www.pjrc.com/store/teensy.html
[teensy-plus]: https://www.pjrc.com/store/teensypp.html
[nut-driver]: http://amzn.to/1RgjN8k
[keyboard-hacking]: http://blog.lmorchard.com/2016/02/06/keyboard-hacking/
[original-notes]: https://github.com/antonizoon/archivis.me/wiki/IBM-Model-M-USB-Controller
[photo-tag]: https://www.flickr.com/photos/tags/modelmcontroller
## Next Steps
### Breadboard to PCB
Like I mentioned before, those ribbon connectors are fragile and meant to be
soldered to a PCB. I'd also like to learn how to design PCBs, so this seems
like a super easy project to start with. The only things needed are places to
solder the connectors, a socket for a Teensy, and traces connecting everything
properly. I wouldn't even need to learn SMD soldering yet!
### Bluetooth
I saw [a project on Adafruit to add Bluetooth support to an IBM Model
M][Adafruit-Bluetooth]. But, that was using the original controller board and
converting from PS/2. With my controller, I could hook a Bluetooth module
directly up to Teensy pins and talk to it from [TMK][]. That should be
interesting.
[adafruit-bluetooth]: https://learn.adafruit.com/convert-your-model-m-keyboard-to-bluetooth-with-bluefruit-ez-key-hid/overview
### Alphanumeric Display
I noticed that a backlit alphanumeric LCD display is pretty much the exact
dimensions of the Num Lock / Scroll Lock / Caps Lock LED area on the keyboard
case. It would definitely be a destructive change, but it might be kind of
cool to replace that section with a text readout. I'm not really sure what it
would display, but it could be a fun little project like a retro-DIY version
of [a Logitech G15 keyboard][g15].
[g15]: http://amzn.to/1TuflVD
### Reset button
Flashing the Teensy firmware usually requires pushing a button on the board.
There are also a couple of pins on the board that do the same when shorted, so
I threaded some wires out of the case to do that. It's ugly.
The [TMK][] firmware also supports a key combination that does the same thing,
which would let me just toss the wires. But, after once or twice where I
locked the firmware and had to reopen the case, I don't think I can totally go
without a reset button.
So, I'm considering where and how to mount an external reset / programming
button that doesn't require any more holes to be drilled or anything else
destructive.
### 60% Model M
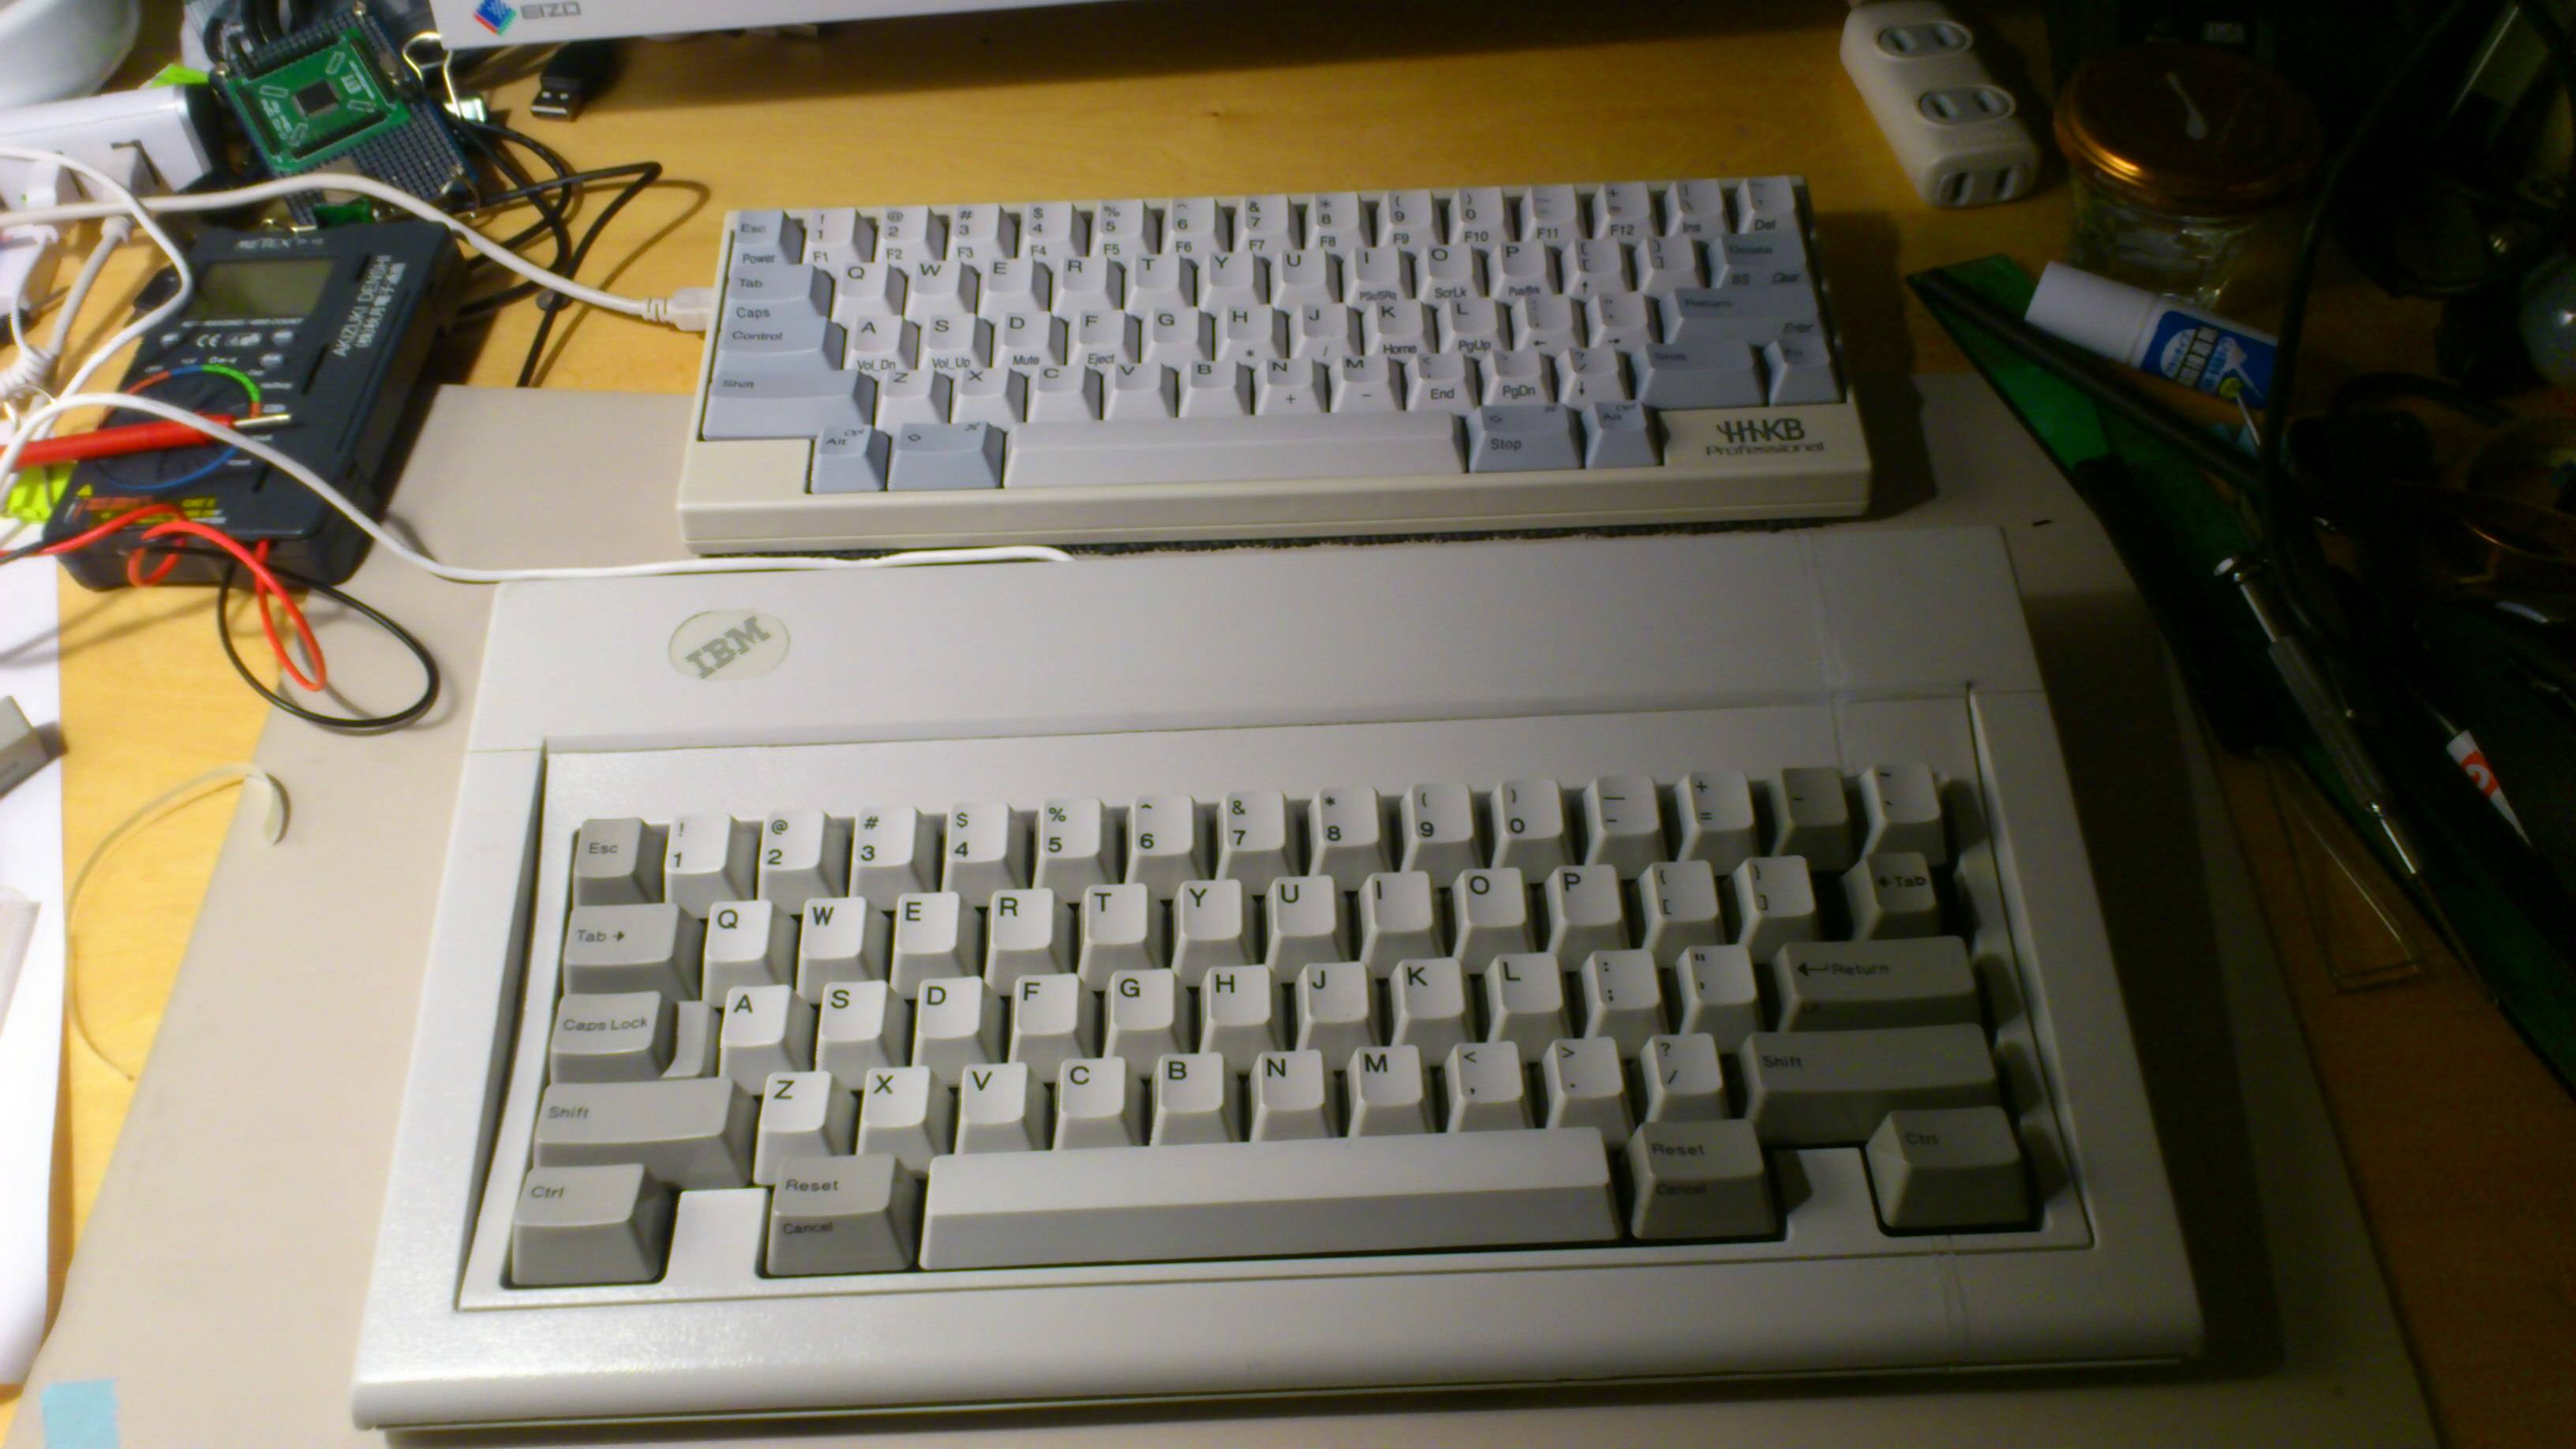
On the topic of destructive changes: [hasu][], the author of the [TMK][]
firmware, [literally carved up][hbkb2] an IBM Model M keyboard and [reduced it
to a 60% layout][hbkb] more comparable to a Happy Hacking Keyboard.
[hasu]: https://geekhack.org/index.php?action=profile;u=3412
[hbkb]: https://geekhack.org/index.php?topic=29483.0
[hbkb2]: https://geekhack.org/index.php?action=profile;u=3412
That project took a bit of work reconstituting the membrane using copper tape
and conductive ink, as well as work to join the plastic bits back together.
But, the electronics end up being simpler after discarding piles of keys.
I know it would be a certain kind of sacriledge to Model M lovers, but I might
attempt it once I get tired of just how huge this keyboard is on my desk.
## Conclusion
This was a pretty fun project, and a bit of a step up from the PS/2 converter
I just built. I learned a bit about the innards of this keyboard, and I've got
some decent next steps to pursue in the future. All of this feels like it's
giving me some good foundational know-how for when I finally get all the parts
together to try building my own DIY keyboard from the ground up.
 ## Driving Me Nuts
Then, I wanted to get inside the keyboard to start tinkering. As it turns out,
opening up an IBM Model M is annoying: None of the tools I had on hand could
do it.
The case is assembled using screws with 5.5mm nut heads, rather than
something like a Phillips-head screw. And, the screws are down in deep wells
too narrow to fit any of the socket wrench heads I had on hand.
So, I had to order [a 5.5mm nut driver][nut-driver] with a very slim head.
Reading [the reviews][reviews], I can see I'm not alone in this.
While that made its way to my house, I'd read that [some folks used a lighter
and a pen][driver-hack] to form a makeshift nut driver. That was a terrible
idea, but it worked. In hindsight, I really should have just waited for the
driver to show up. But, I was determined to get the thing open while I had
time to play with it.
[reviews]: http://www.amazon.com/Dynamite-2803-Nut-Driver-5-5mm/product-reviews/B000BQ4XP6/ref=cm_cr_dp_see_all_summary?ie=UTF8&showViewpoints=1&sortBy=helpful
[driver-hack]: https://deskthority.net/workshop-f7/model-m-disassembly-t1960.html#p34013
## The Original Controller
And, once open, this is the board I found inside:
## Driving Me Nuts
Then, I wanted to get inside the keyboard to start tinkering. As it turns out,
opening up an IBM Model M is annoying: None of the tools I had on hand could
do it.
The case is assembled using screws with 5.5mm nut heads, rather than
something like a Phillips-head screw. And, the screws are down in deep wells
too narrow to fit any of the socket wrench heads I had on hand.
So, I had to order [a 5.5mm nut driver][nut-driver] with a very slim head.
Reading [the reviews][reviews], I can see I'm not alone in this.
While that made its way to my house, I'd read that [some folks used a lighter
and a pen][driver-hack] to form a makeshift nut driver. That was a terrible
idea, but it worked. In hindsight, I really should have just waited for the
driver to show up. But, I was determined to get the thing open while I had
time to play with it.
[reviews]: http://www.amazon.com/Dynamite-2803-Nut-Driver-5-5mm/product-reviews/B000BQ4XP6/ref=cm_cr_dp_see_all_summary?ie=UTF8&showViewpoints=1&sortBy=helpful
[driver-hack]: https://deskthority.net/workshop-f7/model-m-disassembly-t1960.html#p34013
## The Original Controller
And, once open, this is the board I found inside:
 I should have taken a picture of it in place, but oh well. The board has a
grounding strap that was screwed down to the steel plate under the keys.
Beyond that, it just fit into plastic brackets in the case and wasn't
otherwise fastened down. And, in a weird coincidence, the board was almost the
exact same dimensions as my breadboard. Maybe these things are standard sizes?
## Mapping the Membranes
With the keyboard membrane ribbons free from the original board, I hooked them up to
my prototype. From there, I wanted to start making the keys send the right
signals. There are three parts to this:
1. Mapping Teensy pins to a 16 x 8 switch matrix
2. Mapping the 16 x 8 switch matrix to physical key locations
3. Mapping physical key locations to USB key codes
To accomplish #1, [I set up pins in the firmware][pins]. The way this works is
that the rows are set to input and the columns are set to output. By pulsing a
current for each column in turn and reading the rows, you can build up a
matrix of switch state where the circuit is completed. This is called
[scanning the keyboard][scanning]. There are problems in this process - [like
ghosting][ghosting] - but I'll skip describing them for now.
[scanning]: https://www.massdrop.com/article/introduction-to-keyboard-programming
[ghosting]: http://blog.komar.be/how-to-make-a-keyboard-the-matrix/
To double check that I had my matrix working, I threw together an initial
keymap and set every key to emit "1". I tapped each key and saw a "1" in my
notepad. Hooray, it worked! At least, electrically speaking.
[pins]: https://github.com/lmorchard/tmk_keyboard/blob/bdde5f9413ce5c3ea627f201b04f04fe371806ce/keyboard/modelm/matrix.c#L163
For step #2, I started googling for IBM Model M membrane matrix maps. Surely
someone had done this before! Well, [it turns out someone had][matrix-map].
Deskthority user [idollar][] had traced all the wires and annotated the
membranes with row & column numbers in marker:
[idollar]: https://deskthority.net/idollar-u6930/
[matrix-map]: https://deskthority.net/workshop-f7/universal-model-m-controller-t9820.html#p207736
I should have taken a picture of it in place, but oh well. The board has a
grounding strap that was screwed down to the steel plate under the keys.
Beyond that, it just fit into plastic brackets in the case and wasn't
otherwise fastened down. And, in a weird coincidence, the board was almost the
exact same dimensions as my breadboard. Maybe these things are standard sizes?
## Mapping the Membranes
With the keyboard membrane ribbons free from the original board, I hooked them up to
my prototype. From there, I wanted to start making the keys send the right
signals. There are three parts to this:
1. Mapping Teensy pins to a 16 x 8 switch matrix
2. Mapping the 16 x 8 switch matrix to physical key locations
3. Mapping physical key locations to USB key codes
To accomplish #1, [I set up pins in the firmware][pins]. The way this works is
that the rows are set to input and the columns are set to output. By pulsing a
current for each column in turn and reading the rows, you can build up a
matrix of switch state where the circuit is completed. This is called
[scanning the keyboard][scanning]. There are problems in this process - [like
ghosting][ghosting] - but I'll skip describing them for now.
[scanning]: https://www.massdrop.com/article/introduction-to-keyboard-programming
[ghosting]: http://blog.komar.be/how-to-make-a-keyboard-the-matrix/
To double check that I had my matrix working, I threw together an initial
keymap and set every key to emit "1". I tapped each key and saw a "1" in my
notepad. Hooray, it worked! At least, electrically speaking.
[pins]: https://github.com/lmorchard/tmk_keyboard/blob/bdde5f9413ce5c3ea627f201b04f04fe371806ce/keyboard/modelm/matrix.c#L163
For step #2, I started googling for IBM Model M membrane matrix maps. Surely
someone had done this before! Well, [it turns out someone had][matrix-map].
Deskthority user [idollar][] had traced all the wires and annotated the
membranes with row & column numbers in marker:
[idollar]: https://deskthority.net/idollar-u6930/
[matrix-map]: https://deskthority.net/workshop-f7/universal-model-m-controller-t9820.html#p207736
 Just to be clear: These two are not my photos. I stand on the shoulders of
[forum giants][idollar]. But, after awhile, I couldn't really read the
handwriting and started making mistakes.
That's when I remembered [the matrix debug mode in TMK][matrix-debug]: After
configuring just enough keys to enable it, I could just watch the debug
output to tell me the rows & columns as I hit other keys.
[matrix-debug]: https://github.com/tmk/tmk_keyboard#magic-commands
Thus equipped, I spent a Sunday morning over coffee mapping the keyboard:
Methodically pressing keys, noting rows & columns, and building up [the KEYMAP
macro][keymap-macro] that converts symbols for physical keys to logical matrix
positions. Along the way, I also built up [the initial
keymap][keymap-plain] using that macro to assign keycodes to the physical
keys.
[keymap-macro]: https://github.com/lmorchard/tmk_keyboard/blob/bdde5f9413ce5c3ea627f201b04f04fe371806ce/keyboard/modelm/keymap.c#L34
[keymap-plain]: https://github.com/lmorchard/tmk_keyboard/blob/bdde5f9413ce5c3ea627f201b04f04fe371806ce/keyboard/modelm/keymap.c#L54
## Fitting the Prototype
After that, I had an initial stab at steps #2 & #3 - the keyboard was pretty
much working and I could start typing practically with it. But, because I was
hacking on this from the couch, it was all super-awkward holding things
together in my lap.
I should mention that these ribbon connectors have short, fragile leads.
They're really meant for soldering into a PCB. They snap into the breadboard,
but just barely. They spring free at the slightest pressure - you know, like
hooking up ribbons and moving the keyboard around. And, whenever I reinsert
them, invariably one pin or another gets bent up and then snaps off after the
4th or 5th realignment. I'm really glad I bought extras, because I'm down to
my last two that still work.
So, I got tired of things falling apart and started positioning my breadboard
into the case. Everything fit physically, but the parts were all in the wrong
place. With a sigh, I pulled everything out of the board, rewired it, and
reassigned all the pins:
Just to be clear: These two are not my photos. I stand on the shoulders of
[forum giants][idollar]. But, after awhile, I couldn't really read the
handwriting and started making mistakes.
That's when I remembered [the matrix debug mode in TMK][matrix-debug]: After
configuring just enough keys to enable it, I could just watch the debug
output to tell me the rows & columns as I hit other keys.
[matrix-debug]: https://github.com/tmk/tmk_keyboard#magic-commands
Thus equipped, I spent a Sunday morning over coffee mapping the keyboard:
Methodically pressing keys, noting rows & columns, and building up [the KEYMAP
macro][keymap-macro] that converts symbols for physical keys to logical matrix
positions. Along the way, I also built up [the initial
keymap][keymap-plain] using that macro to assign keycodes to the physical
keys.
[keymap-macro]: https://github.com/lmorchard/tmk_keyboard/blob/bdde5f9413ce5c3ea627f201b04f04fe371806ce/keyboard/modelm/keymap.c#L34
[keymap-plain]: https://github.com/lmorchard/tmk_keyboard/blob/bdde5f9413ce5c3ea627f201b04f04fe371806ce/keyboard/modelm/keymap.c#L54
## Fitting the Prototype
After that, I had an initial stab at steps #2 & #3 - the keyboard was pretty
much working and I could start typing practically with it. But, because I was
hacking on this from the couch, it was all super-awkward holding things
together in my lap.
I should mention that these ribbon connectors have short, fragile leads.
They're really meant for soldering into a PCB. They snap into the breadboard,
but just barely. They spring free at the slightest pressure - you know, like
hooking up ribbons and moving the keyboard around. And, whenever I reinsert
them, invariably one pin or another gets bent up and then snaps off after the
4th or 5th realignment. I'm really glad I bought extras, because I'm down to
my last two that still work.
So, I got tired of things falling apart and started positioning my breadboard
into the case. Everything fit physically, but the parts were all in the wrong
place. With a sigh, I pulled everything out of the board, rewired it, and
reassigned all the pins:
 That put the ribbon connectors in the right spots for the keyboard membranes
to connect, as well as room for a USB connector I bought to loop around without
too much bend. Oh, and I slightly rewired things again, because I discovered
I'd connected all the LEDs backward:
That put the ribbon connectors in the right spots for the keyboard membranes
to connect, as well as room for a USB connector I bought to loop around without
too much bend. Oh, and I slightly rewired things again, because I discovered
I'd connected all the LEDs backward:
 ## My Keyboard is Haunted
After all the rewiring and reassigned pins, I fired things up again. This
time, I started getting mysterious spontaneous keystrokes. I thought it might
be a grounding issue with static electricity, because I could usually make it
happen by waving my hands over the keyboard. While a [theremin][]
keyboard might be fun, that's not actually what I was going for here.
[theremin]: https://en.wikipedia.org/wiki/Theremin
So, I ran a wire from the steel plate to the GND pin on the Teensy. That
didn't fix it.
Finally, I realized that one of my new pins in use was D6 - and
D6 is hardwired to an LED on the Teensy board. And, it so happens that LEDs
can do weird things when hooked up as an input - [such as detecting
light][photodiode]. You know, maybe like the changing light from waving my
hands over the keyboard.
Thus, I was able to exorcise my keyboard ghost by bending up the pin at D6 to
disconnect it from the breadboard. Then, I ran a jumper over to D1 and
[switched the pin assignments in the firmware][d0-pin]. No more spontaneous
keypresses.
[photodiode]: http://www.analog.com/library/analogdialogue/archives/48-08/raq_108.html
[d0-pin]: https://github.com/lmorchard/tmk_keyboard/commit/f5b31e9d320d494a4d3fc75db614883b7225d332
## Secrets of 2KRO Matrices
After typing a bit, I realized I couldn't get certain key combinations to work -
Shift-T, for example.
Now, I know that the IBM Model M isn't [an NKRO keyboard][nkro]. That is, you
cannot press any arbitrary combination of keys together. But, of course, a
keyboard is useless if you can't press at least *some* keys together - like, say,
Shift and T. In fact, I've read that the IBM Model M is described as 2KRO -
i.e. two-key rollover.
So, I knew that the original controller supported Shift-T. Looking in the
matrix debug output, I noticed that I couldn't press any 2 keys in the same
row together - that included Left Shift and T.
Scratching my head, I noticed that the membrane matrix had some interesting
properties: Pretty much all the modifier keys were in different columns than
the other keys I wanted to press along with them. So, my problem might be
solved by rotating the matrix - that is, [turning rows into columns and columns
into rows][matrix-swap].
I don't entirely have my head wrapped around the design of the Model M
membrane layout, but I think this is part of it: After I rotated the matrix,
there are 8 columns per row. As far as I can tell, only one key can be pressed
per row - so that means any given key has 7 others that cannot be pressed at
the same time. Practical key rollover, then, is implemented by putting keys
you're likely to press together in different rows.
For example, modifiers like Left Shift and Right Shift share a row, and so
cannot be pressed together. But, Left Shift & T are found in different rows
and can work together. However, some of the letters in the QWER & ASDF cluster
share rows, so that can be trouble for gaming - directional keypresses and
suchlike might cancel each other out in the heat of the keymashing moment.
But, since this keyboard harkens to an era where keys were more for typing
words than for controlling games, the tradeoff makes sense.
[nkro]: https://deskthority.net/wiki/Rollover,_blocking_and_ghosting
[matrix-swap]: https://github.com/lmorchard/tmk_keyboard/commit/afc4d0f23be23e8c69bc1dfbe127898a7fe82db7
## The Result
## My Keyboard is Haunted
After all the rewiring and reassigned pins, I fired things up again. This
time, I started getting mysterious spontaneous keystrokes. I thought it might
be a grounding issue with static electricity, because I could usually make it
happen by waving my hands over the keyboard. While a [theremin][]
keyboard might be fun, that's not actually what I was going for here.
[theremin]: https://en.wikipedia.org/wiki/Theremin
So, I ran a wire from the steel plate to the GND pin on the Teensy. That
didn't fix it.
Finally, I realized that one of my new pins in use was D6 - and
D6 is hardwired to an LED on the Teensy board. And, it so happens that LEDs
can do weird things when hooked up as an input - [such as detecting
light][photodiode]. You know, maybe like the changing light from waving my
hands over the keyboard.
Thus, I was able to exorcise my keyboard ghost by bending up the pin at D6 to
disconnect it from the breadboard. Then, I ran a jumper over to D1 and
[switched the pin assignments in the firmware][d0-pin]. No more spontaneous
keypresses.
[photodiode]: http://www.analog.com/library/analogdialogue/archives/48-08/raq_108.html
[d0-pin]: https://github.com/lmorchard/tmk_keyboard/commit/f5b31e9d320d494a4d3fc75db614883b7225d332
## Secrets of 2KRO Matrices
After typing a bit, I realized I couldn't get certain key combinations to work -
Shift-T, for example.
Now, I know that the IBM Model M isn't [an NKRO keyboard][nkro]. That is, you
cannot press any arbitrary combination of keys together. But, of course, a
keyboard is useless if you can't press at least *some* keys together - like, say,
Shift and T. In fact, I've read that the IBM Model M is described as 2KRO -
i.e. two-key rollover.
So, I knew that the original controller supported Shift-T. Looking in the
matrix debug output, I noticed that I couldn't press any 2 keys in the same
row together - that included Left Shift and T.
Scratching my head, I noticed that the membrane matrix had some interesting
properties: Pretty much all the modifier keys were in different columns than
the other keys I wanted to press along with them. So, my problem might be
solved by rotating the matrix - that is, [turning rows into columns and columns
into rows][matrix-swap].
I don't entirely have my head wrapped around the design of the Model M
membrane layout, but I think this is part of it: After I rotated the matrix,
there are 8 columns per row. As far as I can tell, only one key can be pressed
per row - so that means any given key has 7 others that cannot be pressed at
the same time. Practical key rollover, then, is implemented by putting keys
you're likely to press together in different rows.
For example, modifiers like Left Shift and Right Shift share a row, and so
cannot be pressed together. But, Left Shift & T are found in different rows
and can work together. However, some of the letters in the QWER & ASDF cluster
share rows, so that can be trouble for gaming - directional keypresses and
suchlike might cancel each other out in the heat of the keymashing moment.
But, since this keyboard harkens to an era where keys were more for typing
words than for controlling games, the tradeoff makes sense.
[nkro]: https://deskthority.net/wiki/Rollover,_blocking_and_ghosting
[matrix-swap]: https://github.com/lmorchard/tmk_keyboard/commit/afc4d0f23be23e8c69bc1dfbe127898a7fe82db7
## The Result
 So, after all the above and a few more random adventures in C programming,
this IBM Model M keyboard is now sitting on my desk with a USB cable plugged
into it.
I ordered [some custom replacement keycaps from Unicomp][unicomp] to reflect
some of the remapped keys I implemented - i.e. media control, Command (⌘),
Caps Lock replaced by Ctrl.
I've been having some clicky-clacky fun with this thing, and it's been easy to
reconfigure & reflash along the way as needed. Experience with [TMK][] to
configure my previous project really came in handy.
[unicomp]: http://www.pckeyboard.com/page/category/Buttons
So, after all the above and a few more random adventures in C programming,
this IBM Model M keyboard is now sitting on my desk with a USB cable plugged
into it.
I ordered [some custom replacement keycaps from Unicomp][unicomp] to reflect
some of the remapped keys I implemented - i.e. media control, Command (⌘),
Caps Lock replaced by Ctrl.
I've been having some clicky-clacky fun with this thing, and it's been easy to
reconfigure & reflash along the way as needed. Experience with [TMK][] to
configure my previous project really came in handy.
[unicomp]: http://www.pckeyboard.com/page/category/Buttons
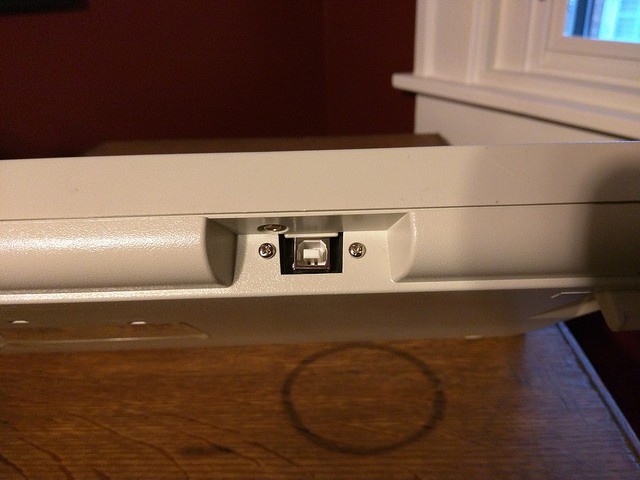 The one part that could be considered irreversible with this project is that I
ended up drilling two small holes in the back to secure the USB port. I'm just
slightly sad about that. But, I guess if I ever sell this thing on eBay, I'll
try talking up the benefits of the new USB controller.
But, otherwise, if I wanted to undo all this work, I could just open it back
up and plonk the original controller back in. I've currently got that board
sitting in an anti-static bag in a drawer, taking a rest after decades of
service.
The one part that could be considered irreversible with this project is that I
ended up drilling two small holes in the back to secure the USB port. I'm just
slightly sad about that. But, I guess if I ever sell this thing on eBay, I'll
try talking up the benefits of the new USB controller.
But, otherwise, if I wanted to undo all this work, I could just open it back
up and plonk the original controller back in. I've currently got that board
sitting in an anti-static bag in a drawer, taking a rest after decades of
service.
 [hasu]: https://geekhack.org/index.php?action=profile;u=3412
[hbkb]: https://geekhack.org/index.php?topic=29483.0
[hbkb2]: https://geekhack.org/index.php?action=profile;u=3412
That project took a bit of work reconstituting the membrane using copper tape
and conductive ink, as well as work to join the plastic bits back together.
But, the electronics end up being simpler after discarding piles of keys.
I know it would be a certain kind of sacriledge to Model M lovers, but I might
attempt it once I get tired of just how huge this keyboard is on my desk.
## Conclusion
This was a pretty fun project, and a bit of a step up from the PS/2 converter
I just built. I learned a bit about the innards of this keyboard, and I've got
some decent next steps to pursue in the future. All of this feels like it's
giving me some good foundational know-how for when I finally get all the parts
together to try building my own DIY keyboard from the ground up.
[hasu]: https://geekhack.org/index.php?action=profile;u=3412
[hbkb]: https://geekhack.org/index.php?topic=29483.0
[hbkb2]: https://geekhack.org/index.php?action=profile;u=3412
That project took a bit of work reconstituting the membrane using copper tape
and conductive ink, as well as work to join the plastic bits back together.
But, the electronics end up being simpler after discarding piles of keys.
I know it would be a certain kind of sacriledge to Model M lovers, but I might
attempt it once I get tired of just how huge this keyboard is on my desk.
## Conclusion
This was a pretty fun project, and a bit of a step up from the PS/2 converter
I just built. I learned a bit about the innards of this keyboard, and I've got
some decent next steps to pursue in the future. All of this feels like it's
giving me some good foundational know-how for when I finally get all the parts
together to try building my own DIY keyboard from the ground up.